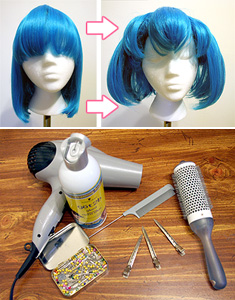
 -Supplies- -Supplies-
-1 wig (the one I'm using for this
tutorial is a china doll wig in blue from cosworx.com)
-Hair clips
-Pins
-Teasing Comb
-Round Brush
-Got2b Hair Spray
-Blow dryer (optional)
-Styrafoam Wig Head
This tutorial is
perfect for getting fuller bangs, spiking, and
adding volume to a limp wig. I don't recommend
using this tutorial on really long wigs. It can
get messy and badly tangled as the fibers are
way longer. Make sure to be really careful with
teasing a longer wig. There are many advantages
to teasing wigs, but remember, it's not a wise
idea to try to brush a fully teased wig out. There
will be tangles and you could really
damage your wig! Try washing your wig first before
lightly brushing and combing to remove the style.
Let's
Get Started! - Teasing the Bangs
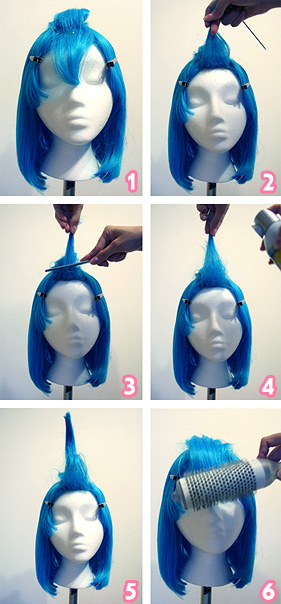 Start
off by pinning your wig securely to the wig head. Start
off by pinning your wig securely to the wig head.
Step 1.
Part your bangs into sections. Keep the
side sections away from the main section of hair
you are working on. You don't want them to get
tangled in the area you are going to be teasing.
Clip back the top layes of your bangs so you can
smooth the unteased hair over the teased portion.
This makes your bangs look smooth and less ratty.
Step 2.
Hold up the bottom portion of your bangs straight
up in the air. This will give you more volume
when you begin to tease.
Step 3.
Start teasing! Back comb your section of hair
using your fine toothed teasing comb. Don't tease
too much! You don't want a lot of nasty tangles!
Lightly tease the fibers to the base of your bangs.
Step 4.
Hairspray
the base of your bangs, and lightly spritz the
top of your section. You can use your hair dryer
on a low setting to dry the hairspray faster.
(I don't do this much with the bangs, just with
the rest of the hair)
[If
you are using this tutorial to spike a wig. Stop
at step 4 and hairspray and mold your spike. Be
sure to use scissors or a razor hair cutter to
point your spike nicely. Repeat all over your
wig untill you get your desired look and style.]
Step 5.
Grab another section of hair leaving enough hair
cliped back to comb and smooth over teased sections.
Repeat steps 2 through 4 on your second section
of hair.
Step 6.
Lightly brush your top section over the
teased sections of hair. It's alright if your
teased sections get brushed out a little. Just
don't brush the base of the teased section out
too much, or you will lose your volume. Hairspray
and mold how you want your bangs to look.
Repeat all these
steps for whatever sections of bangs you have
remaining. This will give your bangs a nice full
and fluffy look; just like in anime!
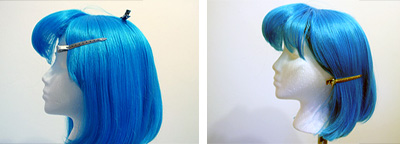
Baby Got
Back! - Teasing the Back and Sides of Your Wig
 This
is basically following the exact steps above but
go about it a bit more carefully as the fibers
are longer and can get tangled easier. This
is basically following the exact steps above but
go about it a bit more carefully as the fibers
are longer and can get tangled easier.
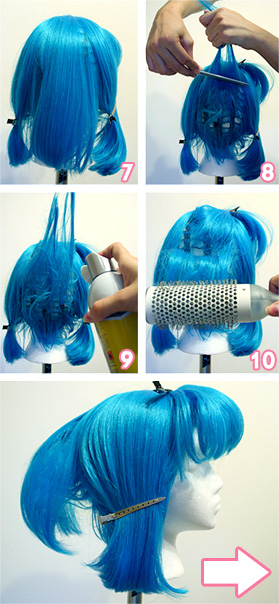
Step 7. Part
the back of your wig into 3 sections. Keep the
side sections away from the middle section of
hair you are working on. (I always find it easier
to start from the middle and working my way out.)
Step 8.
Clip back the top layes of your section of hair.
Hold up the bottom portion of your hair straight
up in the air. Start teasing. Back comb your section
of hair using your fine toothed teasing comb.
Step 9.
Hairspray the base and lightly spritz the top
of your section. I like to use my hair dryer on
a low setting to dry the hairspray faster. Grab
another section of hair leaving enough hair cliped
back to comb and smooth over teased sections.
Repeat step 8 on your second section of hair.
Step 10.
Lightly
brush your top section over the teased sections
of hair to smooth the tangles out a bit and to
give you a nice smooth look.
You will now have
a portion of nicely teased hair that will give
your wig volume! I didn't tease the top sections
of the hair because I wasn't going for the beehive
look, instead I wanted this wig to look fuller
instead of limp.
Repeat these steps
working your way from the center to the sides.
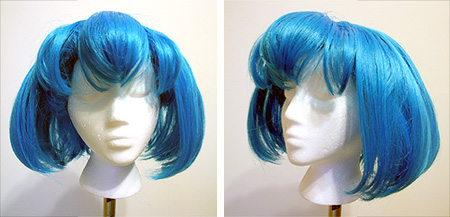
After you have
teased all of your wig, hairspray and mold the wig
into a style you want. I went for the bob look.
After all these steps your wig should have a nice
amount of volume!
|